
Connecting Genesys Cloud to Claude for call-centre insights
Your contact centre contains a wealth of knowledge about your customers, so wouldn’t it be fascinating to ask questions of that data using AI? Well, that’s exactly what this article will show you how to do, by combining Claude Desktop and my Genesys Cloud MCP Server.
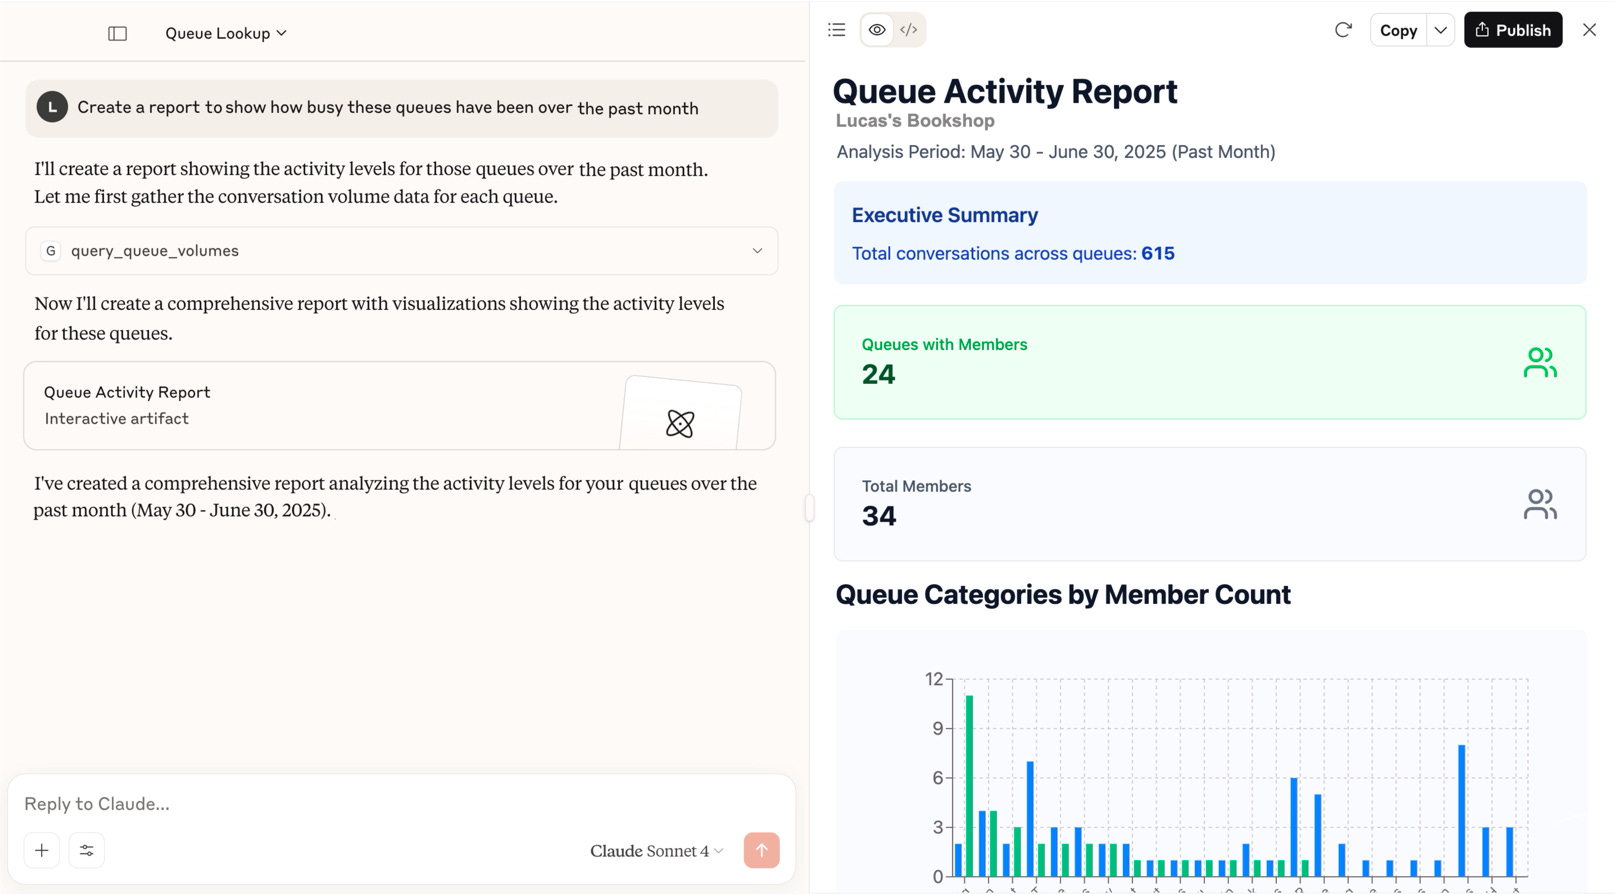
Once we’ve finished you’ll be able to ask AI questions about your contact centre, and even have it produce ad-hoc reports like below:
Before we dive into the setup let’s discuss how it works.
How it works
Claude Desktop is Claude’s official desktop app that lets you interact with their latest and greatest generative models (colloquially called AI). The feature we’ll be leveraging is its ability to be extended using MCP Servers (like mine), which give it access to tools that can interact with external systems, in our case a Genesys Cloud organisation.
The grossly oversimplified process is as follows:
You ask a question, such as “Which queue has the most agents assigned to it?“
The AI understands that it needs a tool to answer the question, and retrieves a list of tools from the configured MCP Server.
Each tool has a name, description and parameters.
AI uses these to determine the best tool, and then calls that tool
The response from the tool is then used to derive an answer
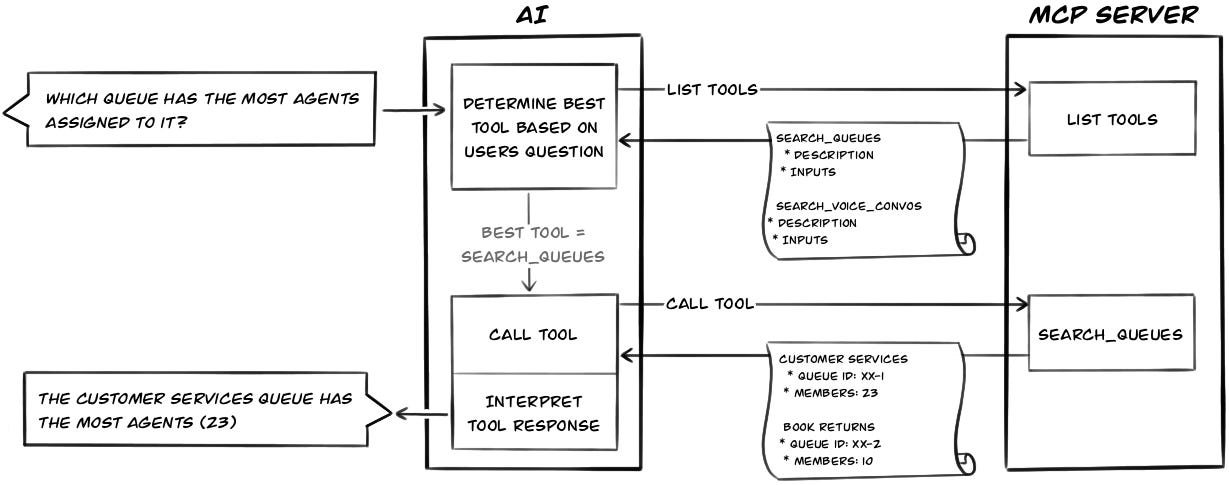
Like I say, that is an oversimplification, but it adequately explains the roles of the various parts that we’ll setup in the next section…
Setup
The setup consists of two parts:
Creating an OAuth Client in your Genesys Cloud organisation
Installing Claude Desktop and configuring it to use the Genesys Cloud MCP Server, along with the OAuth Client configuration

Step 1: Create an OAuth Client
When configuring the Claude to use the Genesys Cloud MCP Server you need to provide OAuth Client Credentials so the MCP Server can access your organisation.

Follow Genesys’ guide for creating an OAuth Client with Client Credentials.
Then assign a role with the following permissions:
Routing > Queue > View
Analytics > Conversation Detail > View
Analytics > Speech and Text Analytics Aggregates > View
Speech and Text Analytics > Data > View
Recording > Recording > View
Alternatively, if you only want to assign permissions for a subset of the tools then you can find permissions per tool in the docs.
Step 2: Configure Claude Desktop to use MCP Server

Now we’ll set up Claude Desktop to use the Genesys Cloud MCP Server, along with the previously created OAuth Client’s credentials.
Install Claude Desktop (and create a free account if necessary)
Follow the official guide for opening the config file
claude_desktop_config.jsonInsert the configuration below:
{
  "mcpServers": {
    "genesys-cloud": {
      "type": "stdio",
      "command": "npx",
      "args": ["-y", "@makingchatbots/genesys-cloud-mcp-server"],
      "env": {
        "GENESYSCLOUD_REGION": "<PUT REGION HERE>",
        "GENESYSCLOUD_OAUTHCLIENT_ID": "<PUT OAUTHCLIENT ID HERE>",
        "GENESYSCLOUD_OAUTHCLIENT_SECRET": "<PUT OAUTHCLIENT SECRET HERE>"
      }
    }
  }
}
Make sure you replace the placeholders with your Client Credentials created in the previous section.
It’s now all done. You can now open a new chat within Claude Desktop and ask a question of your contact centre’s data. Like asking it to analyse a transcript for a disgruntled customer to understand where it all went wrong:
Conclusion
There are few areas more important in a business than the point at which a customer contacts you. So being able to leverage AI to better understand the customer in this space can only be a good thing, and hopefully this article has helped with that.
The Genesys Cloud MCP Server I’ve created, and referenced throughout this article, has a growing set of tools that I’m building and refining based on feedback from the Genesys community.
If you have any thoughts or suggestions, I’d love to hear from you. Feel free to connect with me (and follow me) on LinkedIn.
Using Genesys Australia - works well with Gemini but Claude is blacklisting Genesys Australia - have a case with Anthropic, but is there anything else you can suggest?
After following the step i see below errors in mcp.log..
2025-10-01T07:16:44.027Z [info] [genesys-cloud] Initializing server...
2025-10-01T07:16:44.135Z [info] [genesys-cloud] Using MCP server command: C:\WINDOWS\System32\cmd.exe with args and path: {
args: [
'/C',
'C:\\Program Files\\nodejs\\npx.cmd',
'-y',
'@makingchatbots/genesys-cloud-mcp-server',
[length]: 4
],
paths: [
'C:\\Program Files\\nodejs',
'C:\\Program Files\\OpenSSL-Win64\\bin',
'C:\\WINDOWS\\system32',
'C:\\WINDOWS',
'C:\\WINDOWS\\System32\\Wbem',
'C:\\WINDOWS\\System32\\WindowsPowerShell\\v1.0\\',
'C:\\WINDOWS\\System32\\OpenSSH\\',
'C:\\Program Files\\Git\\cmd',
'C:\\Program Files\\dotnet\\',
'C:\\Program Files\\nodejs\\',
'',
'C:\\Program Files\\Docker\\Docker\\resources\\bin',
'C:\\Users\\Admin\\AppData\\Local\\Microsoft\\WindowsApps',
'C:\\Users\\Admin\\AppData\\Local\\GitHubDesktop\\bin',
'C:\\Users\\Admin\\AppData\\Local\\Microsoft\\WinGet\\Links',
'C:\\Users\\Admin\\AppData\\Roaming\\npm',
'C:\\Users\\Admin\\AppData\\Local\\Programs\\Microsoft VS Code\\bin',
[length]: 17
]
}
2025-10-01T07:16:44.158Z [info] [genesys-cloud] Server started and connected successfully
2025-10-01T07:16:44.571Z [info] [genesys-cloud] Message from client: {"method":"initialize","params":{"protocolVersion":"2025-06-18","capabilities":{},"clientInfo":{"name":"claude-ai","version":"0.1.0"}},"jsonrpc":"2.0","id":0}
2025-10-01T07:17:44.706Z [info] [genesys-cloud] Message from client: {"jsonrpc":"2.0","method":"notifications/cancelled","params":{"requestId":0,"reason":"McpError: MCP error -32001: Request timed out"}}
2025-10-01T07:17:44.707Z [info] [genesys-cloud] Client transport closed
2025-10-01T07:17:44.710Z [info] [genesys-cloud] Server transport closed
2025-10-01T07:17:44.710Z [info] [genesys-cloud] Client transport closed
2025-10-01T07:17:44.711Z [info] [genesys-cloud] Server transport closed unexpectedly, this is likely due to the process exiting early. If you are developing this MCP server you can add output to stderr (i.e. `console.error('...')` in JavaScript, `print('...', file=sys.stderr)` in python) and it will appear in this log.
2025-10-01T07:17:44.712Z [error] [genesys-cloud] Server disconnected. For troubleshooting guidance, please visit our [debugging documentation](https://modelcontextprotocol.io/docs/tools/debugging)
2025-10-01T07:18:09.654Z [info] [genesys-cloud] Server transport closed
2025-10-01T07:18:09.655Z [info] [genesys-cloud] Client transport closed