
CX as Code with Genesys Cloud
The time is almost 5 o’clock. You’ve just finished making the final changes to a call flow’s dependencies and you’re ready to shut down your computer for the day. Just as you reach for the power button, a message pops up from your boss:
“Agents are reporting that no calls are coming through. Did you break something?”
Your heart sinks. But then you remember: you’re using CX as Code. With a single command you revert your changes, confirm agents are receiving calls again, and head home with a jaunty step.
The happy ending to this story is thanks to CX as Code. Without it, you’d be stuck in the drudgery of manually undoing your changes. In this article, I’ll explain what it is, how it works, and why it matters for your contact centre.
If you’d rather see it in action straight away, here’s my open-source project:
https://github.com/MakingChatbots/genesys-cloud-cx-as-code-demo
In future articles I’ll discuss creating an automated pipeline to test and deploy changes, so be sure to subscribe:
What is CX as Code
CX as Code, also known as Infrastructure as Code (IaC) is the concept of representing parts (or even all) of your contact centre as code. Queues, flows, data tables, integrations, and more can all be defined this way.
This is what a queue looks like defined as code:
resource "genesyscloud_routing_queue" "book_refund_queue" {
  name                 = "Book Refund"
  description          = "Processes refunds for books"

  enable_transcription = true
  acw_timeout_ms       = 300000
  auto_answer_only     = false
}
CX as Code is made possible using a tool called Terraform, which has been extended by Genesys with their own Terraform provider.
As you’ll see later, with resources like this queue defined as code you’ll be able to use a single command to create, update or delete them against any of your organisations.
Why represent resources as code?
Amazing things start to happen when you represent your organisation as code:
Disaster Recovery - You can redeploy your entire contact centre (or parts of it) at the tap of a button, should disaster befall you
Tracking changes - If you store the code in source-control then you can audit every change
Reliability - You can test changes to your contact centre’s development organisation then reliably deploy the same changes to your production organisation.
You can even bake all this into an automated process to test, peer-review and deploy changes between Genesys Cloud Organisations.
Demonstrating CX as Code
Now to the fun bit! Let’s create and deploy a simple journey using CX as Code.
The full solution for this journey is over on my GitHub.
What we will build
We will build a simple digital chatbot journey comprising of:
Messenger Deployment / Configuration
Inbound Message Flow
Digital Bot Flow
Transfer to existing queue

Then deploy it against two organisations:
Development - where we can test it
Production - where real users use it

Defining your resources as Terraform
As I mentioned previously, CX as Code is built upon a tool called Terraform, which Genesys have extended via their Terraform provider to be able to represent Genesys Cloud resources. Terraform can then deploy these against any of your organisations.
So if we take our simple chatbot journey and represent it as Terraform resources in files it will look like below:
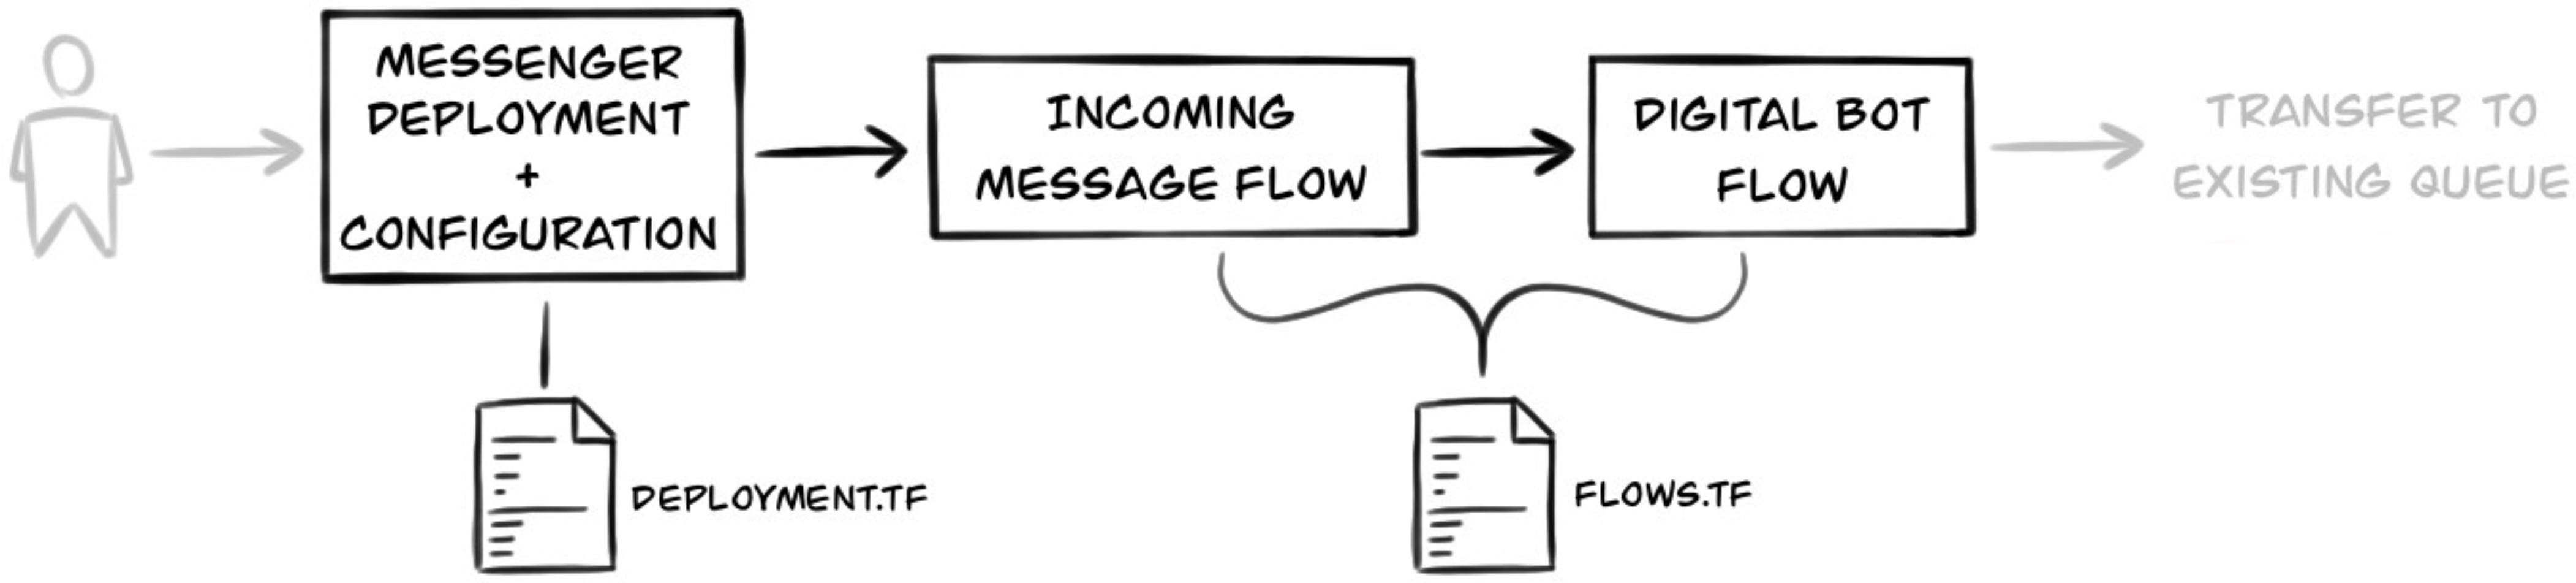
deployment.tf - Contains the Messenger Deployment and Configuration
flows.tf - Contains both Incoming Message and Digital Bot flows
Around the peripheries there are also other files that are necessary:
provider.tf - Defines the providers Terraform must use, and how they should be configured
variables.tf - Defines the variables that can be configured per environment
terraform.tfvars - Defines the values for the variables in variables.tf. There is one of these for each org
Let’s go over the most important files above in more detail.
Provider configuration (provider.tf)
When we tell Terraform to deploy our Genesys Cloud resources it needs some way of knowing what they are and how to deploy them.
The provider.tf file tells Terraform:
Exactly which version of Terraform can be used on this project
That it should use the Genesys Cloud provider, and what version
Where it should save the State of the resources it manages - for simplicity’s sake this project stores the state locally.
# provider.tf

terraform {
  required_version = "~> 1.12.2"

  required_providers {
    genesyscloud = {
      source  = "mypurecloud/genesyscloud"
      version = "~> 1.68.3"
    }
  }

  # Using local backend for
  backend "local" {}
}

provider "genesyscloud" {
  # Credentials will be set via environment variables
}
Variable definitions (variables.tf)
When we run Terraform we can provide variables that it will use to define resources differently for each organisation.
The variables.tf in this project allow a different queue name to be used for each organisation:
# variables.tf

# ...

variable "book_purchase_queue_name" {
  type        = string
  description = "Name of queue for book purchases"
}
Messenger Deployment (deployment.tf)

The deployment.tf file contains two resources:
Below is simplified version of the file in the repo that explains some important concepts:
# deployment.tf

resource "genesyscloud_webdeployments_deployment" "contact_us" {
  name    = "Bookshop Support"

  # References the flow resource the Messenger Deployment will use
  flow_id = genesyscloud_flow.inbound_message_flow.id

  configuration {
    # References the configuration resource above
    id = genesyscloud_webdeployments_configuration.default.id
    #...
  }
}

resource "genesyscloud_webdeployments_configuration" "default" {
  name        = "Lucas' Bookshop Config"
  description = "Configuration for Contact Us page"
  #...
}
There is an important concept at work in this file:
One resource can reference a value of another resource - as is being done with the flow_id above. Terraform is clever enough to realise these dependencies and adjust the order that resources are created
Architect Flows (flows.tf)
The flows.tf file is where we will create our Incoming Message Flow and Digital Bot Flow. This is also where we will transfer to a queue that already exists in our organisation.
The definition for the flows themselves are defined in YAML. These are the YAML files that are exported from the Architect UI.
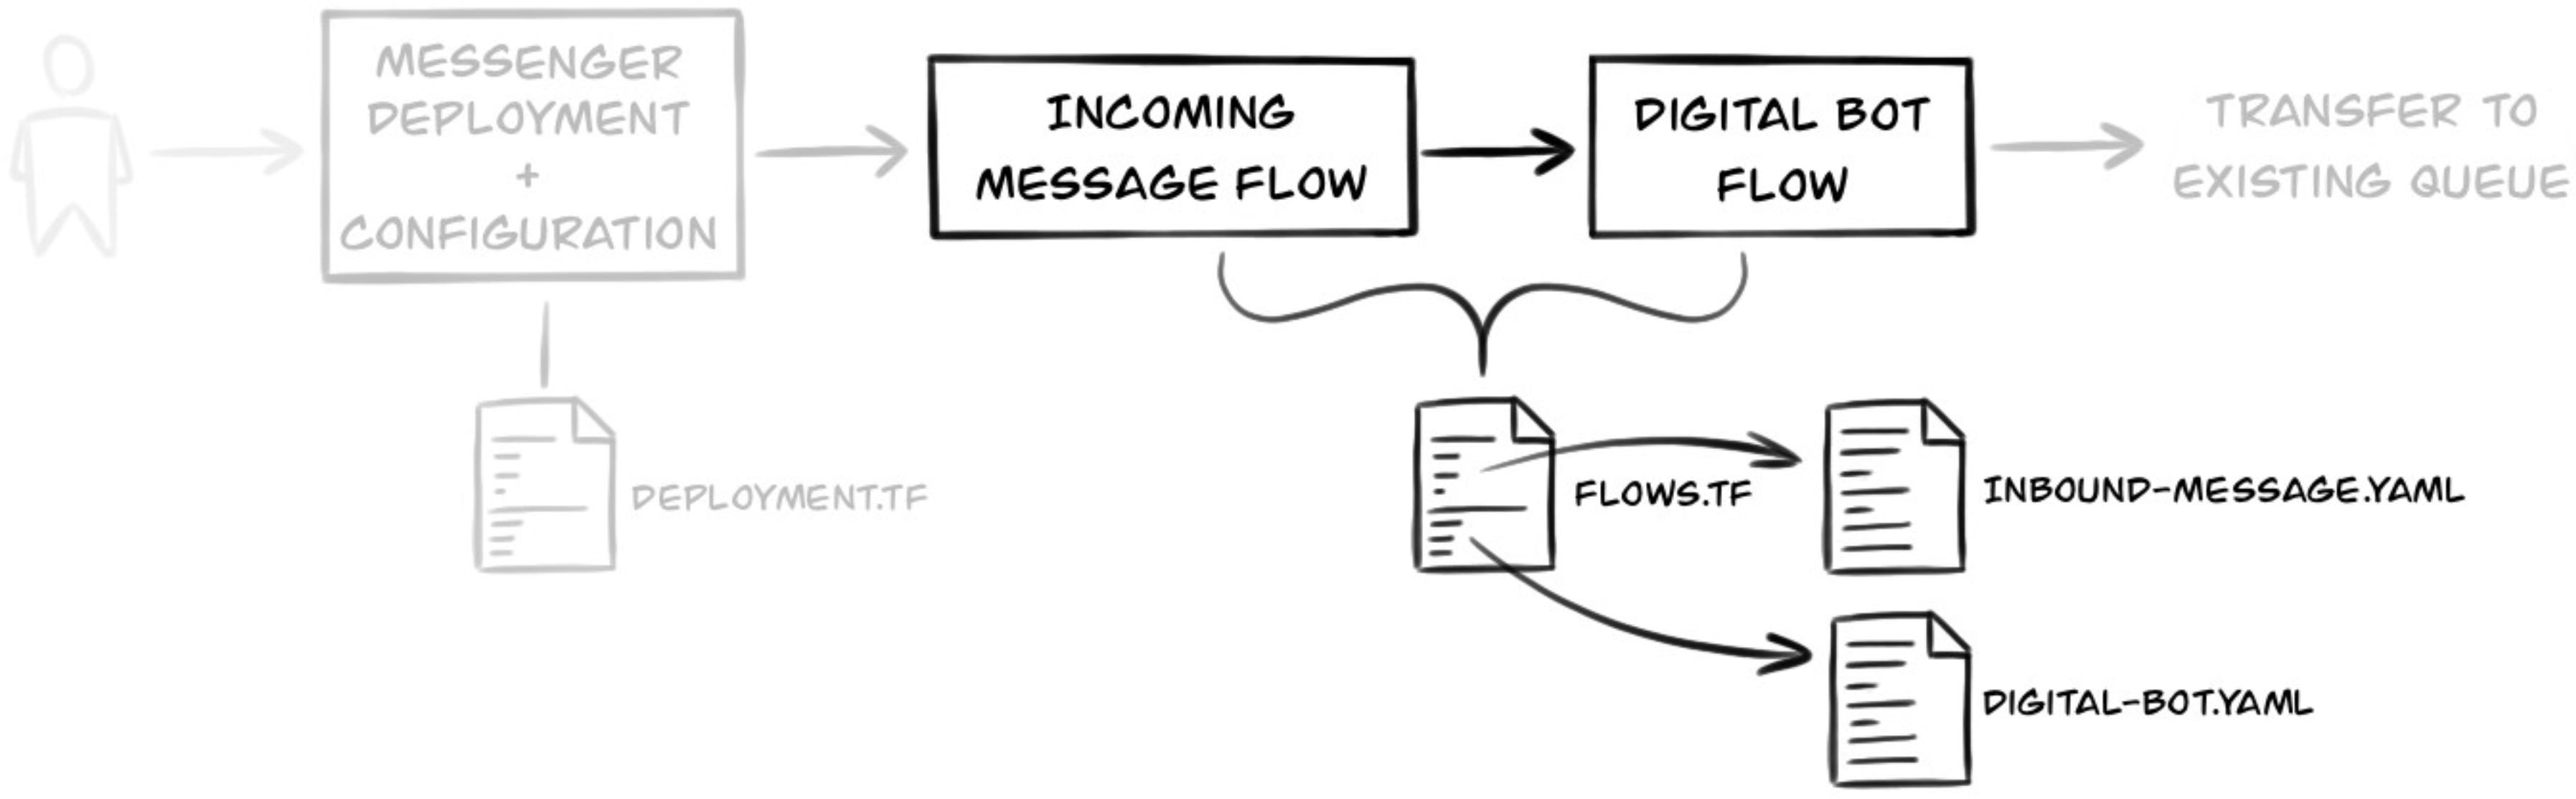
The flows.tf file contains a resource that is used by each flow:
Each of these point to the flows’ definitions:
# flows.tf

locals {
  # Locations of where the flows are defined
  inbound_msg_flow_filepath = "${path.module}/flows/inbound-msg.yaml"
  digital_bot_flow_filepath = "${path.module}/flows/digital-bot.yaml"
}

resource "genesyscloud_flow" "inbound_message_flow" {
  filepath = local.inbound_msg_flow_filepath

  # A unique has created to detect when the flow's YAML file changes
  file_content_hash = filesha256(local.inbound_msg_flow_filepath)

  # This is how you can configure your flow definition
  substitutions = {
    bot_flow_name = genesyscloud_flow.digital_bot_flow.name
  }
}

resource "genesyscloud_flow" "digital_bot_flow" {
  filepath = local.digital_bot_flow_filepath
  file_content_hash = filesha256(local.digital_bot_flow_filepath)

  substitutions = {
    book_purchase_queue = var.book_purchase_queue_name
  }
}
There’s an important concept at work here, called substitutions:
Substitutions allow values to be passed into the flow’s YAML definition. In our journey we are using them to pass in the name of the queue the flow will transfer to - which differs per organisation.
The flow’s YAML below shows the substitution {{book_purchase_queue}} being used.
# flows/digital-bot.yaml

digitalBot:
  name: Transfer To Queue
  bots:
    # ...
    actions:
      - transferToAcd:
        name: Transfer to ACD
        targetQueue:
          lit:
            name: "{{book_purchase_queue}}"
Deploying to an organisation

We now have our journey defined as code. Let’s now move on to how we deploy it to our dev organisation.
Initialising Terraform is the first thing we have to do. In this step we also tell it where we want it to save the state of what resources it manages, which is defined in the backend.hcl file.
terraform init -backend-config=envs/dev/backend.hclNext we share the Client ID and Secret of the OAuth Client that Genesys’ Terraform Provider will use to access our dev organisation.
export GENESYSCLOUD_REGION=<region>
export GENESYSCLOUD_OAUTHCLIENT_ID=<OAuth Client ID>
export GENESYSCLOUD_OAUTHCLIENT_SECRET=<OAuth Client Secret>
Finally we run Terraform’s apply command, and pass in the variables we have defined for the dev organisation.
terraform apply -var-file=./envs/dev/terraform.tfvarsWhen you run
applyit will create a plan of what resources it needs to create, delete or update. You get a chance to check this plan and approve it.
Once we have tested and/or iterated on the deployment to the dev organisation, we can then deploy to our production org.

We follow the same steps, but this time with the OAuth Client for our production organisation and pointing to the production backend and variable files.
terraform init -backend-config=envs/prod/backend.hcl

export GENESYSCLOUD_REGION=<region>
export GENESYSCLOUD_OAUTHCLIENT_ID=<OAuth Client ID>
export GENESYSCLOUD_OAUTHCLIENT_SECRET=<OAuth Client Secret>

terraform apply -var-file=./envs/prod/terraform.tfvars
Once again you’ll be presented with the plan to confirm before any changes are made to your organisation.

That’s it! We’ve now used CX as Code to deploy a change reliably to our two organisations.
Taking control of existing resources
The journey we deployed across our organisations both referenced an existing Queue. But what if we also wanted to bring the Queue under the management of Terraform?
This is actually an easy task, and is made possible by either of the following options:
Terraform’s import block - great for specific resources you want to import
Genesys’s tf_export resource - great for a type of resource e.g. all queues, or all flows
Since we have a single resource we want to bring under the control of Terraform I will use option 1, Terraform’s import block.
To use the import block we create the following file, which contains two parts:
The resource we’ll import the resource under ‘genesyscloud_routing_queue.book_purchase‘
An import block where we provide the ID of the queue to import (taken from the queue’s URL in the Genesys Cloud org)
# queue.tf

import {
  # ID of the queue in Genesys Cloud, taken from the Queue's URL
  id = "5b1761c1-632a-402b-aa28-6e858ed520f9"

  # Resource to import the queue to (aka the resource below)
  to = genesyscloud_routing_queue.book_purchase
}

resource "genesyscloud_routing_queue" "book_purchase" {
  name = "Book Purchase (${var.environment})"
}
Once defined you can run the import command (after the setup commands) to import the resource into your Terraform’s state:
terraform init -backend-config=envs/dev/backend.hcl

export GENESYSCLOUD_REGION=<region>
export GENESYSCLOUD_OAUTHCLIENT_ID=<OAuth Client ID>
export GENESYSCLOUD_OAUTHCLIENT_SECRET=<OAuth Client Secret>

terraform import
Terraform’s import command will import the name, ID and configuration of the queue in the dev organisation.
You should then import the Queue in the Production organisation using the same approach, being sure to replace the Queue’s ID in the import block.
import {
  id = "32bc2add-4e5e-4794-b281-8eb82780b552"
  ...
}
...
Once you’ve completed the above steps then both queues will be controlled by Terraform.
Conclusion
In this article we covered:
What CX as Code is
How you can use it to reliably deploy resources across your organisations
How to reference existing resources
Finally, how to import those resources into CX as Code
My hope is that you will have come away from reading this article with a new found enthusiasm for what is possible with CX as Code, and how you might apply it to your organisation. As David Gwartney, an AI Solutions Architect at Genesys reminded me, you don’t necessary have to implement this wholesale. It can help even if wanting to iterate quickly on a small project.
Enjoyed this article? Follow me on LinkedIn and subscribe to this newsletter to keep up to date.